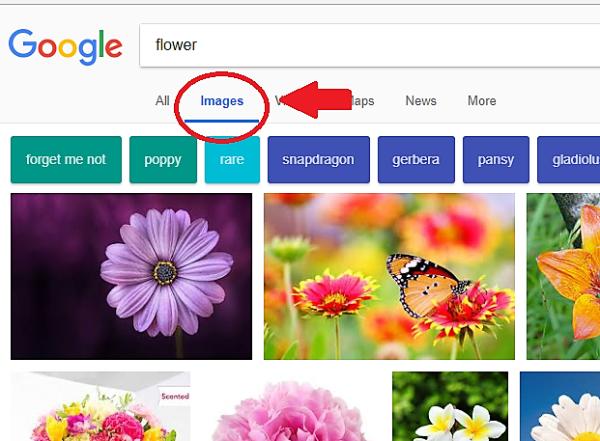
Google Images is a section of google that enlists thousands of images related to the keyword that you enter. Whatever image you are looking for, enter its name in your Google search engine and thousands of pictures related to that keyword will be displayed on your screen. You can search for an image directly in Google Images or search for it over the web and then click the Google Images button to view related pictures. Once you find the image of your choice, you might want to save it on your device to use it or view it later.
If you want to save an image from google, don’t worry, it’s much easier than you may think. This is why in this oneHOWTO article want to help you by giving you complete instructions on how to save a picture from Google Images.
Copying and saving images from internet on your device
To copy and save an image from the internet, follow these steps:
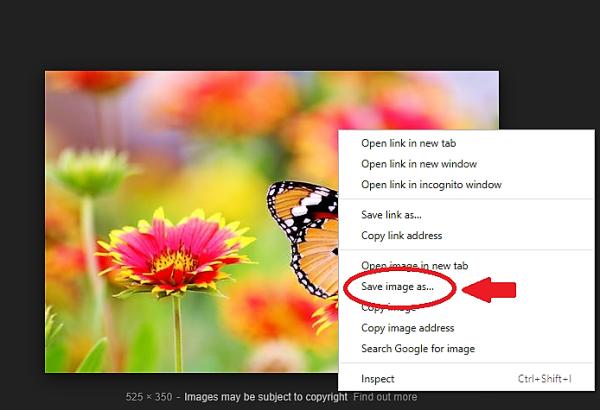
- If you are using Mac: click and hold the image. For a PC: right click on the image.
- A dialog box will appear.
- Internet Explorer users have to select ‘Download Image to Disk’, and Netscape users have to select ‘Save this Image as’.
- Another box will popup, in which you will be asked in where you would like to save the image.
- Navigate to reach the folder where you keep your saved images on your device.
- Most of the time, these images have a special code as their file name. It is always better to rename the image and give it a name that you will remember.
- When the ‘Save Image As’ box opens up, rename the image.
- If you are using a Mac, make sure that your file name ends with .jpg. If you are using your PC, this extension will be automatically added to your file name.
- Click on ‘Save’ and your image will be saved in the desired location that you selected.

Saving Google images in chrome for Android
While looking for an image on Google, you can quickly save it without consuming phone storage or bookmarking it in your browse. Now, when looking for an image in Chrome using your Android device, you may save it so that you can access it later. Follow these steps:
- Search for the image of your choice using Google Image search.
- Tap on the image that you want to save.
- You will see a star icon next at the bottom right corner of the image.
- Tap on this star icon to save it into your favorites. You can save as many images as you want.
- Once you save your images, you can access them later by tapping on the ‘View Saved’ button on the top of the page.
An added bonus is that you can also organize your saved images with tags. These tags will help you so that you can easily find them later. To do this , just tap on the image that you want to tag, enter the edit menu by clicking on the pencil icon next to it, and then add a tag of your choice.
Saving Google images on an Android device
While surfing the web on your Android device, you may come across an image that you would like to save. Here are the steps to follow when you want to download images from internet to an Android device:
- First of all, search for the image you are looking to save.
- Once you find your desired image, tap on it and hold it down until a dialog box appears.
- You will see a ‘Save Image’ tab in this box. Click on this tab and your image will start downloading. Usually, an image downloads within a second, but if it’s larger in size, it may take around a minute.
- Pull your notification shade down to look for your download notification.
- Click on that notification to open the image. You may also go to your Gallery and look for the image in your ‘Downloads’ file.

Saving Google images on a Macbook
Here are the step by step instructions on how to save a Google Image to your Macbook:
- Find the image that you want to save.
- Google allows you to save and download the images, but not all gives such permissions. If you find an image on a website, such as Instagram, you will not be able to download it.
- You will mostly find this image in a ‘Preview’ format, and you will have to click it or tap on it in order to open it.
- Hover your Macbook’s mouse over the picture that you want to save.
- Press the Control key, then click on the image, and release the Control key.
- A pop-up will appear. In some Macbooks, you will have to hold the image after clicking it in order to open the pop-up.
- You may also right click the image by pressing the Mac’s trackpad with 2 fingers. Some Macbooks allow you to right click on the image by pressing the right hand side of the trackpad.
- Click on ‘Save Image to Downloads’, after which your image will start downloading in your Macbook’s ‘Downloads’ folder. This folder is literally named as ‘Downloads’ unless you rename it.
- In some Macbooks, you need to click on ‘Save Image As’ button and select a name and location for the image once downloaded.
Saving Google Images on Macbooks using Drag and Drop Method
In addition to the above mentioned method, you can also save an image on your Macbook using the drag and drop method. Follow these instructions:
- Find the image that you want to download.
- Resize the window of your web browser.
- You will see a yellow circle on the upper left corner of the image containing a window. Click on this circle to make your window smaller in size that you can see your Macbook’s desktop in the background.
- Click on the image and hold it using your mouse pointer.
- Drag the picture off until you suspend it on your desktop.
- You will see a transparent form of the image while you drag it.
- Once you see a white plus sign in the green circle over the picture’s thumbnail, release the click that you were holding till now.
- Doing this will place the image on your Macbook’s desktop.
- From here, you can cut and paste the image into your desired folder.

Which format to save the file in
You can save your image file into a number of different formats. This chosen format will depend on how you want to use this image. The format will also influence the photo’s resolution, and determine whether you can re-edit it or not. Some popular formats are:
- PSD: This is a proprietary format of Adobe, and is commonly used for programs like: Photoshop, Lightroom and Elements. Save your file in PSD format when you want to access individual layers of the image, especially while creating montages or collages.
- TIFF: If you want to edit the image several times without losing the photo’s information, then you should save your image in this format.
- JPEG: This is a common file format that produces high quality, manageable images that can be easily shared without any specific software. Once you have completed your editing and layering, or if you do not wish to edit the image, then you can save the image in JPEG format.
- PNG: If your image needs transparency, needs to be made smaller and/or if you don’t want to use it over the web, then you can save your image in this format.
If you want to read similar articles to How To Save A Picture From Google Images, we recommend you visit our Internet category.