How To Fix iPhone 4 WiFi Antenna At Home


If your iPhone 4 does not connect well with wireless networks, you may have a problem with your antenna. In this OneHowTo article we explain how to check if your iPhone 4 wifi antenna has a problem and how to fix it.
If following this step-by-step guide does not solve your problem, at least you have eliminated one possible cause of the poor Wi-Fi coverage on your iPhone. One good indicator that this antenna problem is the issue is that you'll need to be very close to the Wi-Fi source to get a good connection.
Steps to follow:
First, we need to warn you of the risks. Opening an iPhone may void your warranty. If you still have an active warranty, it is not advisable to follow this tutorial. Instead, visit an Apple store and exchange your iPhone. It should be noted that unauthorized repairs can sometimes lead to further complications, so proceed with caution.
At this point, I should say that I tried this method and it worked for me, which is why I'm sharing it. However, this solution will not solve all the antenna problems for an iPhone Wi-Fi connection, as due to the complex nature of these kinds of devices, it could be a great number of issues. It is the easiest and seemingly more common issue to fix, so it's worth giving it a try if your phone is out of warranty. Additionally, some users have reported that simply tightening a few screws improved their Wi-Fi performance significantly.
The first step is to turn off your iPhone; never try to open and handle your device like this when it's switched on. This is to prevent any potential electrical hazards and to ensure that the internal components are not damaged during the process.
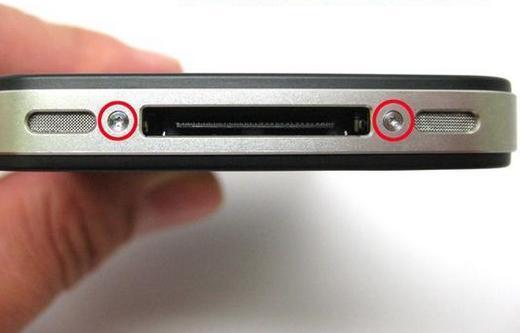
Next, you need to open the iPhone by unscrewing the two screws on either side of the charging/data cable port. For this step, we will need a small screwdriver because otherwise, we won't be able to get the screw out! Make sure you're using the correct screwdriver to prevent stripping the screws, which could make future repairs much more challenging.

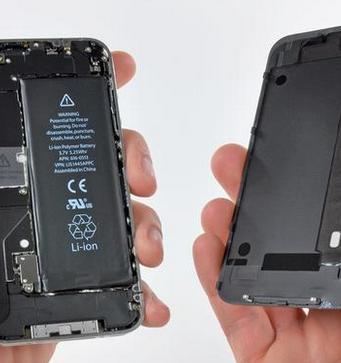
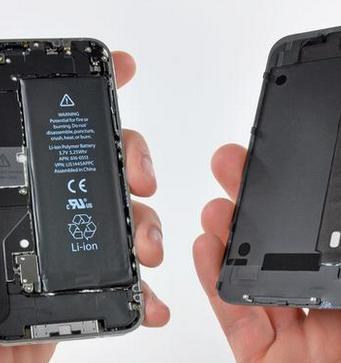
The next step is to separate the back panel of the iPhone on one side and the rest of the mobile on the other. It is important to do this with the screen face down to avoid dropping the battery. This step requires a gentle hand, as any forceful movement might damage the internal components or the back cover itself.

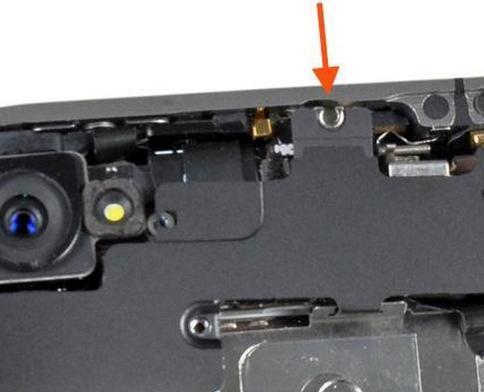
If you look in the picture below, this is where you'll find the problem. There is a small screw where the arrow is pointing in the picture which was causing the problem with my Wi-Fi antenna. I checked it with a small screwdriver and realized that it was loose. So I pressed it down very carefully. The problem was that the small screw of the antenna was not making full contact which meant that the Wi-Fi signal weakened. For example, even a slight misalignment can lead to significant signal loss, impacting your ability to connect to networks reliably.

The next step is to replace the back cover of the iPhone by carefully putting it back into place and replacing the screws at the bottom of your iPhone. Easier than you expected, right? If after doing this your iPhone 4 Wi-Fi still doesn't work, take it to a shop. At least you know you have tried one thing and eliminated this possibility. Similarly, some professionals might offer a diagnostic service to identify other potential issues that could be affecting your device's performance.
If you want to read similar articles to How To Fix iPhone 4 WiFi Antenna At Home, we recommend you visit our Electronics category.